Roof flashing is an essential element for proper waterproofing of the roof. Flashing helps create a good seal between certain key materials. Its proper installation is crucial to protect your roof from the elements and to avoid any water penetration.
The installation of a roof flashing is not that simple. It is vital to install it properly in order to effectively seal your roof. Proper tools and expertise are essential. Calling on an expert roofer is the best solution for proper installation.
Les Couvreurs Duro-Toit’s expert roofers explain how to install roof flashing and everything you need to know about them.
What is roof flashing?
Flashing is a metal roofing element, usually made of galvanized steel, although it can also be made of zinc or copper. Flashing is installed on “critical” areas of the roof, for example, where certain roofing elements such as the chimney or roof ventilation elements meet.
The purpose of flashing is to waterproof the roof and drain water away from these areas so that it does not seep into your roof. The water runs down the flashing and is redirected to the roof shingles and gutter systems so it can drain away.
Different types of roof flashing
Before we dive in to flashing installation, it is important to know the different types of roof flashing. There are many different types of roof flashing.
Base flashing
Base flashing is made up of two pieces. Designed to make water run off its surface and drain it away, it provides excellent waterproofing. This flashing is composed of two parts that enable it to move naturally with the expansion and contraction of the roofing elements located underneath it.
Base flashing is an essential element to face the harsh weather conditions that may occur in Quebec.
Apron (or continuous) flashing
Also known as continuous flashing, apron flashing is used to direct water to the asphalt shingles. Unlike base flashing, this one is made of one piece and offers less flexibility against expansions and contractions. This is why it is composed of dilatation joints, which allow it to limit the risks of breaking during seasonal changes.
Counter flashing
Counter flashing is a waterproof material installed against the face of an overlap of a roof which seals the roof from water exposure and the elements.
Valley flashing
Valley flashing is intended to be installed under the valleys where two faces of a roof meet to protect this area from roof leaks.
In other words, valleys are the junctions of two roof slopes with a concave angle.
Step flashing
Used at the joint between the wall and the roof (with a chimney for example), step flashing is a rectangular piece folded with 90° angles, which is very useful for pitched roofs.
Kickout flashing
Kickout flashing is used to fill the gap left by the installation of step flashing and the gutter. Kickout flashing disperses water into the gutter.
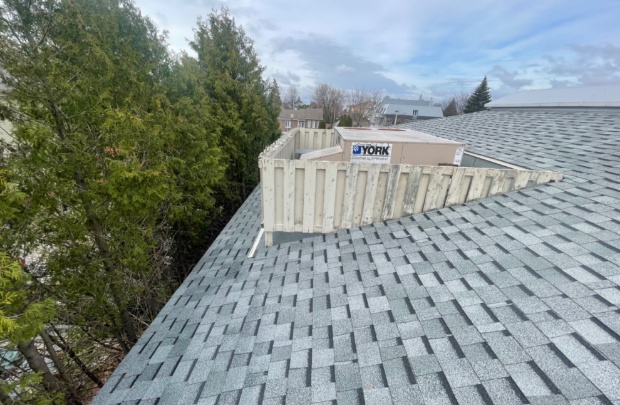
Skylight flashing
Skylight flashing is installed on these to ensure the roof is watertight. Skylight flashing can be made by roofers or supplied by the manufacturer with the skylight.
Drip edge flashing
Roof drip edges are types of flashing placed along the edge of the roof so that water can drain properly without seeping in and damaging the house.
Steps on how to install roof flashing
Reminder: To avoid any problems and to properly protect your roof, it is highly recommended to leave the installation of roof flashings to a professional roofer. Depending on the type of flashing, the installation method will vary.
Here’s how to install a step flashing, a flashing widely used for pitched roofs:
1 – Install the underlayment and install the roof shingles so that the flashing can rest on them
2 – Cut the flashing at a 45° angle using tinsmith shears from the projecting corner to the centerfold. Then remove the formed triangle to get a good angle for your step flashing
3 – Fold the flashing and fit it around the corner. Nail this at two points on each top corner. Make sure the flashing is at least 8 inches above the shingle. The flashing must lie flat
4 – Place a second piece of flashing and fold it over to overlap the corner flashing
5 – Remove the second piece and seal where the flashings overlap, then replace the piece. Nail the bottom of the flashing together
6 – Install a step flashing where the next shingle begins. Make sure the piece overlaps well and apply sealant to the base of the flashing
7 – Repeat as many times as necessary
8 – Finish the roof flashing work by trimming another piece of flashing
9 – Bend the other side of the piece to finish the roof ridge. Use glue to finish the piece
Trust the roofers at Duro-Toit to install your roof flashing
Roof flashing installation is a complex procedure requiring a skilled technique and the proper tools. While it is possible to do this on your own, it is strongly recommended that you hire a professional roofer. The survival of your roof against bad weather is at stake.
A badly installed flashing can lead to numerous waterproofing problems and infiltrations that can have serious consequences. Our Montreal roofers are used to doing this kind of work and are the perfect choice for your flashing installation!
Contact us today! Our team will be happy to help you install flashing on your roof to ensure that it is waterproof and durable.
More posts
Guide to Flat Roof Construction in Quebec
8 April 2024
6 Tips to Extend the Life of Your Roof
21 March 2024